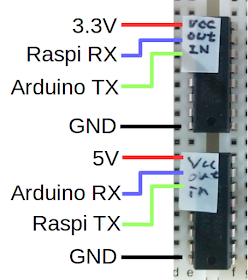
レベル変換ICの説明をしているサイトはあるものの、接続方法を図で解説しているサイトを見つけられなかったので、備忘録を兼ねてメモを残します。
目的
ArduinoとRaspberry piで、通信において下記のやりとりを行います。- Raspberry piが文字(x)を送信
- Arduinoが受信した旨(got: x)を返信
- Raspberry piでArduinoが送信した内容を表示
使ったもの
Arduino nanoRaspberry pi B+
ブレッドボード
ジャンパワイヤ
オスメスジャンパワイヤ
CD74HC4050
回路の接続方法
CD74HC4050はレベル変換ICです。Vccに接続した電圧がoutputの電圧になります。
Raspberry piへの3.3V出力とArduinoへの5V出力を確保するために、CD74HC4050を2個使います。
Arduino nanoとRaspberry pi B+で配線すると、このようになりました。
お使いのRaspberr piのピン配列がどうなっているかは、下記のサイトが参考になると思います。
Simple Guide to the RPi GPIO Header and Pins
ソフトウェアの準備
下記のような接続で、Arduino IDEとRaspberry piのssh画面でシリアル通信を行います。
Arduinoへプログラムを書き込み
software serialで受信した改行以外の文字を返信するプログラムを書き込みます。
serial_for_raspberry_pi
#include <SoftwareSerial.h>
SoftwareSerial rasp_serial(4,5); // rx, tx

int i;
char buff[255];
char buff_char;
int buff_max_length = 255;
int buff_length;

void setup() {
  rasp_serial.begin(115200);
}

void loop() {
  buff_length = 0;

  for ( i=0; i<buff_max_length; i++ ) {
    if (rasp_serial.available()) {
      buff_char = rasp_serial.read();
      if ( buff_char != '\r' && buff_char != '\n' ) {
        buff[buff_length] = buff_char;
        buff_length ++;
      }
    }
  }

  if ( buff_length > 0 ) {
    for ( i=0; i<buff_length; i++ ) {
      rasp_serial.print("got: ");
      rasp_serial.println(buff[i]);
    }
  }
  delay(50);
}
Raspberry piのシリアルからログインできる機能をoff
raspberry piはデフォルトの状態だとgpioのシリアル通信ができません。なぜなら、シリアルポートを通してログイン出来る機能が動いているからです。
シリアル通信を有効にするため、シリアルポートからのログイン機能をoffにします。
raspberry piのコンソールで、下記のコマンドを入力して設定画面を開きます。
sudo raspy-config
設定画面を開けたら、「8 Advanced Options」を選択します。
「A8 Serial」を選択します。
「No」を選択して、シリアルからのログイン機能をoffにします。
ログイン機能がoffになりました。
「finish」を選択して、raspi-configを終了します。
raspi-configの設定が終ったら、再起動します
sudo reboot
Raspberry piでシリアル通信を行うプログラムを作成
Raspberry piの適当な場所に、gpioでシリアルl通信するプログラムを準備します。mkdir draft_projects cd draft_projects vi gpio_serial.py
gpio_serial.py
import serial
import time

port = serial.Serial("/dev/ttyAMA0", baudrate=115200, timeout=3.0)
port.open()
time.sleep(0.1)
port.flushInput()
port.flushOutput()
# time.sleep(1)

while True:
  for char_to_send in ['a', 'b', 'c', 'd']:
    # port.flushInput()
    # port.flushOutput()
    port.write(char_to_send)
    print("\r\nwrote " + char_to_send)

    time.sleep(0.1)
    rcv = port.readline()
    print("Got: " + repr(rcv))
    time.sleep(1)
動作確認
回路を作成し、ソフトウェアの準備が整ったら、sudoを付けてRaspberry piでプログラムを実行します。cd ~/draft_projects sudo python gpio_serial.py
成功すると、下記のような出力が得られます。
wrote a
Got: 'got: a\r\n'

wrote b
Got: 'got: b\r\n'

wrote c
Got: 'got: c\r\n'

wrote d
Got: 'got: d\r\n'
以上です。
何かの参考になれば嬉しいです。
参考
raspberry piのピン一覧です。
シリアル通信の設定方法解説ページです。
http://www.instructables.com/id/Read-and-write-from-serial-port-with-Raspberry-Pi/
gpio serialに関するRaspberry piのフォーラムです
https://www.raspberrypi.org/forums/viewtopic.php?f=44&t=17360
シリアル通信プログラムの参考にしました。
http://codeandlife.com/2012/07/29/arduino-and-raspberry-pi-serial-communication/
i2c向けですが、Arduinoの公式ページでCD74HC4050が言及されていました。
http://playground.arduino.cc/Main/I2CBi-directionalLevelShifter


0 件のコメント :
コメントを投稿